Hey all! Looking at the prices for pre-made buildings specifically for flames of war, that plus the unavailability of the models themselves led me to try my hand at building one. But then I thought if I could build
one, maybe I could try making a mold of it and then I could cast as many as I need out of hydrocal. In this tutorial, I made a rural building in 15mm scale, but it can be stepped up or down for any scale.
So the first step was to actually make up some wall sections. I found this adhesive backed "rock wall" at a local hobby store. I cut some foam board into the right sized pieces and stuck the rock wall onto them. I decided on 3" by 2" because I would be able to fit 2 FOW medium sized bases or 1 tank into the building when it was finished.
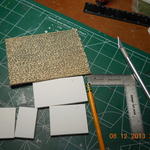
Here they are in progress.

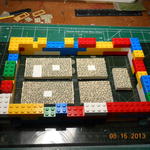
And here they are complete, basically in the same arrangement that the final mold will take. I added in the smaller blank section to be able to make up "L" shaped houses in future.
Now is the time to set up the mold box. I found the best 'tool' for this is a bunch of Lego blocks. They hold together well and the size can easily be expanded to whatever is needed for the mold. Just be sure to leave at least 1/2" between the wall sections and the edge of the mold. When I got it set up it looked like this:
At this point, it is important to spray the walls and the mold with a mold release agent. I use an aerosol from 'Smooth-On" which is the company I get my mold making materials from. I don't think they ship to the UK and if they did the price would be outrageous. I found this site
PS Composites but have no idea what they offer and at what prices. But the info is there if interested.
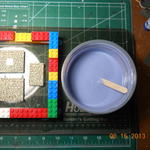
So now the mold is all sprayed up and ready to go. The silicone I use is called "OOMOO" and it is a simple mix 1:1 part 'A' and 'B' product. When mixing, try to do it without getting a ton of air bubbles in the mix. This is difficult to accomplish, and in the end I had some pretty good sized air pockets in there, but after casting the first walls, I didn't have any real problems because of it. So here's the silicone mixed up and ready to go.
Pour the silicone into the mold carefully starting at one end and pouring it over all the pieces of wall. Then tap the mold from the bottom for a minute or two to help the larger air bubbles rise to the surface. Then place it on a level surface and leave it alone! All these products come with a recommended de-mold time which needs to be followed. In a nutshell, it's better to be over that amount of time by an hour than being under it and un-molding too soon. I've left molds to cure overnight and un-molded the next morning with no problem at all.
So now with the mold made, it's time to cast up some walls. I use a product called Merlin's Magic. It's a gray colored hydrocal with a built in release agent and when it sets up it is very hard and not brittle. Hydrocal is a good choice also and I've still got a bunch of castings made from hydrocal that are in great shape. Rather than go into the entire casting procedure, here's a link to a casting tutorial on a site here called Hirst Arts.
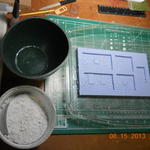
Hirst Arts Casting Instructions So here's the finished mold along with my mixing tub and the Merlin's Magic ready to go. The most important thing to remember is to always add the hydrocal to the water! What I do is figure out how much water I need for each individual mold I have, and I write that amount on the back of the mold. This way I always make the right amount each time.
Once the hydrocal has completely set, and this again varies from product to product, all you have to do is pop out the wall sections, let them dry overnight and assemble them. You might have to clear up the edges a bit. For this I use a hand rasp made for smoothing the edges of gypsum wallboard. And when it's finished, it should look like this:
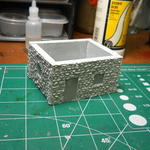
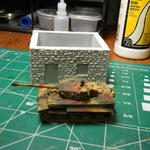
This building is large enough to hold 2 medium flames of war bases, and it's even big enough to hide a Tiger tank!
In the next tutorial, I'll cover painting it up and finishing it off with doors and windows and maybe some foliage. Still undecided about making a roof for it. From a modeling standpoint it would look like a nice finished building, but I don't really think it's all that necessary from a gaming point of view. But I have time to decide on that.
Hope you enjoyed this tutorial.
TW


 Login
Login


