Smoke/Flame Markers
I've seen some nice looking markers on various Flames of War batreps and was curious how they were made. A bit of searching around and I found a you tube video on how to make them. The guy doing the video did a nice job, but he talks so damn much he could have condensed the 30 minute video into about 2-3 minutes! I can't do videos yet (probably for the best!) so here in step by step format is what I came up with.
For materials, you need a coin or a disk, some thin wire, leftover (or new) clump foliage, super glue, PVA glue, and the usual paints and brushes.
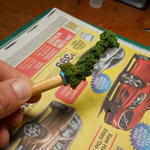
To start, I cut some thin wire about 7" in length, bent it in half, formed a loop at one end and twisted it together. I then took a 1¢ piece, covered it with thick superglue and stuck the wire loop to the coin.

I then immediately gathered some bunches of clump foliage and held it against the coin until it set.

You can see that there's different colored clump foliage used. It really doesn't matter what colors you use because it will all be painted over anyway. Next, put a good bead of superglue on the wire and keep adding clumps of the foliage until the wire is all covered over.

It looks like something out of the blob at this point but once the glue sets, you pull the loose clumps off which thins it down somewhat. You're trying to get a column of smoke here and it's up to you how thick or thin you want it. This is the time also to trim it to whatever length you need. To hold onto it for the next steps, I used blue tac to hold the base down to a wooden dowel.
Here's where I departed from the video instructions. He mixed up some PVA glue in water and then brushed the glue over the foliage. I used wood glue instead of the white PVA because I find that it dries better than the white. I mixed the PVA about 50/50 with water in a plastic tub. I made sure it was fairly deep. Instead of brushing the glue mixture on, I just dipped the whole thing into the glue mix.
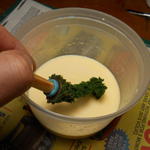
I let it drip off a bit into the tub, but it's really loaded with the glue mixture. I found it was best to invert it over the tub and let the majority of the mix drip off.
When it stopped dripping, I inverted it, stuck the dowel into a piece of Styrofoam, and left it to dry for at least 24 hours. It's better to let it dry a little longer if in doubt.

After it has dried completely, I primed it with a gray spray primer. I use flat gray from rustoleum, but you can use whatever you have available. After it dried, I gave it a black wash but you can skip this step if desired.
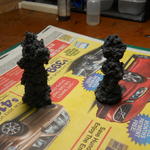
Now to do up the flames! I know as modelers we are used to putting the darker colors on first, then the next brightest and so on. For a fire though, you need to do the exact opposite. If you look at an actual fire, you notice it's yellow at the center, then it goes through orange and red as the flames cool off. In fact, the hottest flames are really blue and white. So for this reason, I started with some bad moon yellow around the base of the column. I wanted to make sure that I got the yellow deep into the recesses since I would be building the flame out from there.

Once the yellow dried, I painted blazing orange over the area, making sure to let a good amount of the yellow show.

Then I finished them off with some blood red for the flames and highlighted the top of the column with a bit of ghost gray.

Now when an enemy tank gets knocked out, it literally can become a smoking wreck!

I might drybrush a little black on the bottom over the flames to look like it's a greasy, oily fire, but I'll see how they look on the battlefield first.
Hope this helps, hope it's not too long or has too many pictures.
As always, C&C and any questions most welcome.
On final note, since the foliage was left over from other projects, the wire was kicking around and the other materials were those that I had on hand anyway, the final cost of this project was the coin I used for the base, 1¢!
For materials, you need a coin or a disk, some thin wire, leftover (or new) clump foliage, super glue, PVA glue, and the usual paints and brushes.
To start, I cut some thin wire about 7" in length, bent it in half, formed a loop at one end and twisted it together. I then took a 1¢ piece, covered it with thick superglue and stuck the wire loop to the coin.

I then immediately gathered some bunches of clump foliage and held it against the coin until it set.

You can see that there's different colored clump foliage used. It really doesn't matter what colors you use because it will all be painted over anyway. Next, put a good bead of superglue on the wire and keep adding clumps of the foliage until the wire is all covered over.

It looks like something out of the blob at this point but once the glue sets, you pull the loose clumps off which thins it down somewhat. You're trying to get a column of smoke here and it's up to you how thick or thin you want it. This is the time also to trim it to whatever length you need. To hold onto it for the next steps, I used blue tac to hold the base down to a wooden dowel.

Here's where I departed from the video instructions. He mixed up some PVA glue in water and then brushed the glue over the foliage. I used wood glue instead of the white PVA because I find that it dries better than the white. I mixed the PVA about 50/50 with water in a plastic tub. I made sure it was fairly deep. Instead of brushing the glue mixture on, I just dipped the whole thing into the glue mix.

I let it drip off a bit into the tub, but it's really loaded with the glue mixture. I found it was best to invert it over the tub and let the majority of the mix drip off.

When it stopped dripping, I inverted it, stuck the dowel into a piece of Styrofoam, and left it to dry for at least 24 hours. It's better to let it dry a little longer if in doubt.

After it has dried completely, I primed it with a gray spray primer. I use flat gray from rustoleum, but you can use whatever you have available. After it dried, I gave it a black wash but you can skip this step if desired.

Now to do up the flames! I know as modelers we are used to putting the darker colors on first, then the next brightest and so on. For a fire though, you need to do the exact opposite. If you look at an actual fire, you notice it's yellow at the center, then it goes through orange and red as the flames cool off. In fact, the hottest flames are really blue and white. So for this reason, I started with some bad moon yellow around the base of the column. I wanted to make sure that I got the yellow deep into the recesses since I would be building the flame out from there.

Once the yellow dried, I painted blazing orange over the area, making sure to let a good amount of the yellow show.

Then I finished them off with some blood red for the flames and highlighted the top of the column with a bit of ghost gray.

Now when an enemy tank gets knocked out, it literally can become a smoking wreck!

I might drybrush a little black on the bottom over the flames to look like it's a greasy, oily fire, but I'll see how they look on the battlefield first.
Hope this helps, hope it's not too long or has too many pictures.
As always, C&C and any questions most welcome.
On final note, since the foliage was left over from other projects, the wire was kicking around and the other materials were those that I had on hand anyway, the final cost of this project was the coin I used for the base, 1¢!