Login

Username:


Password:


Remember me


Forgot Password?


 Merchandise


TWAT persents...a table!!!

For members to post long running threads about projects they are working on

TWAT persents...a table!!!

Postby ruffian4 » Wed Feb 20, 2008 2:41 pm

The T.W.A.T. gaming table.
A potted history of our triumphs, disasters and mega disasters.

Written by…undecided.

Day 1.
Ok, bad start. We have had a row.
Jubilex wants to write this, as he thinks that because I didn’t exist at the time most of this took place, it can only be fair.
However, I have pointed out that technically, jubilex doesn’t exist on AOS. So this can only be done by me. So, spack, if he tries to sign up, don’t let him into the lovely site, he will only muck it up.

If the other three were still around, we could have beaten him up, but jubilex is a chapter master plague marine and I’m only a noob.

Tinkly piano music, visual fade in to years ago…

The various members (tee hee) of TWAT have “tried to do war gaming” for years. But, a crappy layout and unpainted figures left us pretty bored with the whole thing.

I had played wfb once (when I was still at school), didn’t like it.
Years later, played rogue trader once too, thought it was ok.

But, shortly after, our role-playing group broke up.
Cue one grand reopening of the local GW (I didn’t even know we had one!) and a desire to “do something different” we laid down the manifesto.

Ye shall try out this 40k thing.
Thou shalt not have a crappy board and get bored with the board.
Thou shalt not put any unpainted model upon said board lest we become bored with the models upon the board.

And written in the blood of baby birds, so it was.

Boarding school.

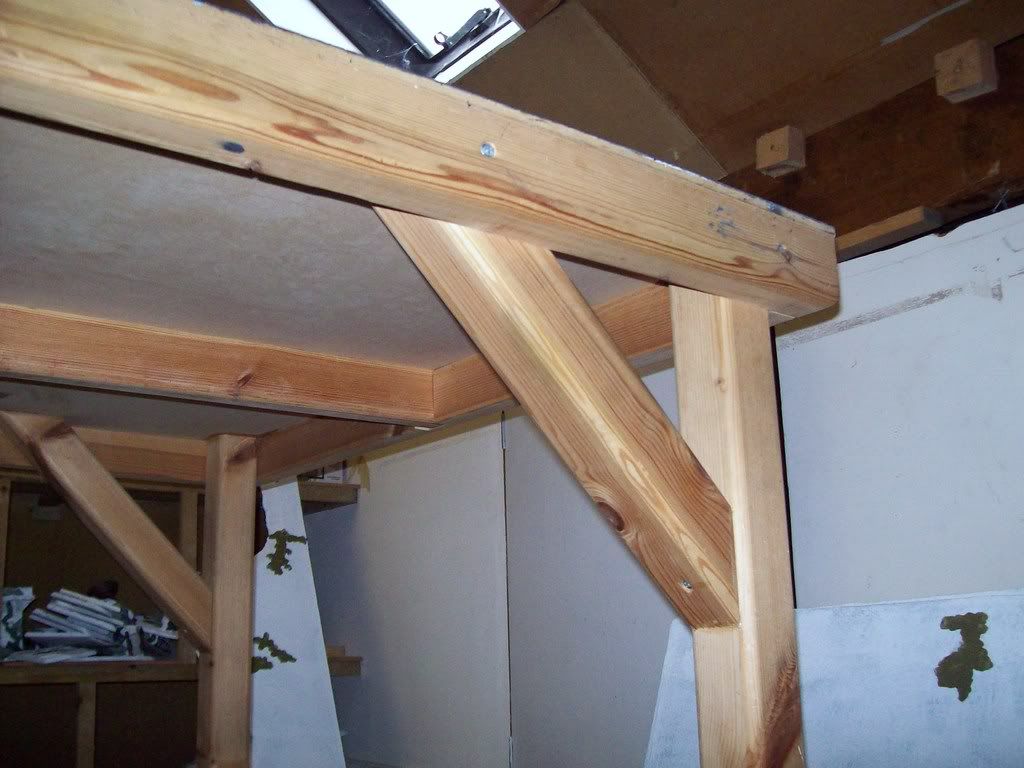
Ok, so the tables we had before were somewhat ramshackle affairs, from what was really a sandbox, to the ill-fated D-Day landings table (with real water…but not for long).

The best one we had was made by an old (ex)mate of mine’s dad. It was good but not quite sturdy enough.
We were playing Napoleonic’s at the time, about 500+ models on each side. Of course, they were all lined up neatly, so when someone bumped the table…we had the “domino effect.”

“You ******* *****, ****** ****** twat.” This is where the TWAT moniker came from.

So, at the time (about 10 years ago) I knew a pro carpenter and he put it together for us for £65.
We got some stools from a refitting betting shop, which considering the amount of dice that are thrown around up there, seems quite appropriate.

Image

Right so, onto the board itself.

As I mentioned before, we had gotten bored of the board before so what to do?

We decided that the mantra would be “We want as many different options as possible.”
So, with that in mind, we opted for the modular approach.

So, the 8x4 table divided into 8 2x2 squares.

At this point it occurred to me that I could make canals by sinking them into the modular boards, lining up the entrance/exits of them to fit.
Then another brain wave hit home.

Why not paint the board to look like water, so when the canals go over the top it will look quite realistic.
Also, we could put a few hills dotted about directly on the table to create islands!
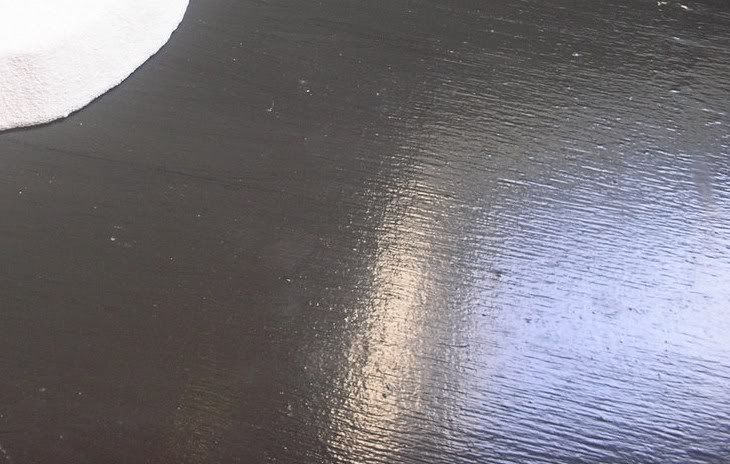
Water colours.

How do you paint water? Not only was gw water effects years away, but it would burst the budget.
I had always liked the look of war films set in winter snows, they are kind of evocative of Napoleon and Hitler in Russia and create a bleak atmosphere of pointless destruction. This seemed to fit the 40k style pretty well.

So, dark murky water alongside the stark white of the snow then, nice contrast.
I started with black emulsion, watered down slightly and gave the whole board a generous coat.
Before it dried, I added a dark green (olive green*) emulsion to the mix and “wet brushed” swirly lines in.

Approx 10 coats went on, a little more green added to each, never letting the previous coat dry to blend it.

On top of that, went 10 coats of watered down pva (letting each coat dry this time).
The depth effect built up quite nicely.

*From hive fleet brawns house. I often tease his misses about having a “swamp green kitchen!”

Image

What would I do differently?

It may be because my table is in the loft, but the pva never quite dried out (it was left for weeks). Time came round for a game and when the poly boards went over the top, little bits of paint stuck to the pva and have left some white marks.
I should really have sealed it with something more heavy duty. Floor varnish maybe?

Up next base boards, canals and the road to ruin.
Last edited by ruffian4 on Wed Feb 20, 2008 3:16 pm, edited 4 times in total.
killmaimburn wrote:If this is a masked ball, then the other bits of him are off spiking the teachers punch.


DEATH WATCH DEATH RATTLE DEATHS DOOR AINT I DIED ENOUGH BEFORE?
User avatar
ruffian4
4th dan imbecile
Sorceror
 
Posts: 3065
Joined: Sun Dec 09, 2007 12:00 am
Location: Twat hq.

Postby ruffian4 » Thu Feb 21, 2008 10:26 am

Day 2.
Jubilex has gone out, so an update...hang on, no replies? No-one interested? :(

Drum and base boards.

The cheapest and easiest material to work with would be polystyrene, so we opted for that.
There is a builders merchants just round the corner from me, but the day we went for the poly, was really windy and even 18 stone stargod nearly took off a few times, carrying what actually amounted to a hang glider you see.

Each of the boards were cut from 8x4 sheets (that, rather annoyingly, turned out to be slightly less than the advertised size (bloody padded bra/pant socks builders merchant)).

The medium density poly would be prone to damage, so I decided to line it with card. I put a “[“ shaped piece of (cereal packet or pizza box) card covering each edge and pva’d and masking taped them down.
This method has proved to be very solid and reliable.

Cheap and (not so) cheerful.

So, a snowscape, then.
Tbh, not only did we like the idea of wintry battles, it would be cheap to do too.
On original costing, grass mats/flock would blow the pitiful budget up like a plasma gunner.

The plan therefore was to use sand for the texture, which would save us a bomb.

I hadn’t considered any problems with bacteria, so went ahead and got some regular grade builders sand (for course “rocky adrien” surfaces) and sharp/silver sand, which is lovely stuff, for the base snow.

One third water to two pva (decent quality wood glue) painted on and a thin covering of sand, which I applied quickly with a sieve. This was left on for no more than about thirty seconds, after which the excess was shaken off.

Note. The glue then sand should be applied to the entire piece at once. If you do bits at a time, such as sloped edges of hills, then the flat surfaces of a contour, it will result in ugly “bulges” and lines. Do any of us like ugly bulges?
Also, the longer you leave sand on, the more likely that any puddles of pva will soak through, forming similar patches.

I applied 2 good coats of white masonry paint which really formed a solid (if unkind to toppled models and their paintjobs) surface. This was dry brushed grey and patches of flock were added to give a “thawing” effect and break up the white.

Image

At the mo, I’m thinking about adding patches of slush with pva and icing sugar. Experiments are due soon (which means when it is warm enough to venture into the shed of doom or SOD).

Imperial trenches, hq dugout and mortar pit.

Image
Last edited by ruffian4 on Thu Feb 21, 2008 10:41 am, edited 7 times in total.
killmaimburn wrote:If this is a masked ball, then the other bits of him are off spiking the teachers punch.


DEATH WATCH DEATH RATTLE DEATHS DOOR AINT I DIED ENOUGH BEFORE?
User avatar
ruffian4
4th dan imbecile
Sorceror
 
Posts: 3065
Joined: Sun Dec 09, 2007 12:00 am
Location: Twat hq.

Postby Spack » Thu Feb 21, 2008 11:33 am

That's looking pretty good. Although the red sandbags look a bit odd to me personally.

What did you use for the internal trench walls? I've been looking to make some trenches, and I can't bring myself to buy the FW trench parts no matter how good they look.
Last edited by Spack on Thu Feb 21, 2008 12:29 pm, edited 1 time in total.
User avatar
Spack
I R Ginger
Field Marshall
 
Posts: 6815
Joined: Sat Feb 12, 2005 12:00 am
Location: Birmingham, UK
Medals: 2
Bronze (1) Painting Entrant (1)
Blog: View Blog (29)

Postby killmaimburn » Thu Feb 21, 2008 12:01 pm

I didn't reply because I didn't want to mess up your already done project loggy bits (interval for peeps to talk poo) Liking your use of pizza boxs, and I went out a few days back to get some air drying clay from ELC (its gone down in price :D , so Lily might actually to get to use some for makeing it MR maker!) so its nice to see the sand bags to have something to work towards.. Did you quickly squidge together a row of 30 and then arrange them then once set paint the wall?, or did your build the bricks\sandbags as you built the wall.. (i might try making a few hem lines on mine..depends on how easy they are to manipulate.
Barely even lurking..
ruffian4 wrote:Handy fellow, this kmb...Like Ahriman delving the paths of the webway ...
World of ME First try at Apoc Batrep WHAT/WHO is AOS?
User avatar
killmaimburn
Now Vanus Clade
 
Posts: 6581
Joined: Fri Sep 21, 2007 12:00 am
Location: Nottingham, mid-land
Blog: View Blog (1)

Postby ruffian4 » Thu Feb 21, 2008 1:25 pm

He isn't back yet so...

This is the ruin of the benedictus imperat.
Caspar hates this thing, he has never won a game with this on the table.

Jubilex inherited some darker green flock than the stuff he had been using. So, he thought it would look pretty cool as ivy, the other ruins have now been “retro fitted” with it.

Image

Image

I now have some xmas decorations, bells on a chain and will (eventually) make a collapsed bell tower to go in the centre if he lets me.

What would I do differently?
You can see some of the lines of card around the edges where the pva seeped under the masking tape.
I don’t think there is much he could have done about this. But, maybe he should have cut the card, on the upper surface of the board, into irregular shapes, to disguise it?
As far as the church is concerned, I wish he had made the walls double thick, to allow him to make stained glass window style "lead lighting."
Last edited by ruffian4 on Thu Feb 21, 2008 1:51 pm, edited 3 times in total.
killmaimburn wrote:If this is a masked ball, then the other bits of him are off spiking the teachers punch.


DEATH WATCH DEATH RATTLE DEATHS DOOR AINT I DIED ENOUGH BEFORE?
User avatar
ruffian4
4th dan imbecile
Sorceror
 
Posts: 3065
Joined: Sun Dec 09, 2007 12:00 am
Location: Twat hq.

Postby ruffian4 » Thu Feb 21, 2008 2:10 pm

Spack wrote:That's looking pretty good. Although the red sandbags look a bit odd to me personally.

What did you use for the internal trench walls? I've been looking to make some trenches, and I can't bring myself to buy the FW trench parts no matter how good they look.

They do look quite red in the pics. In reality they are quite brown.

The trench walls are just strips of card and matchsticks.
I'm thinking of doing some signposts and graffitti on them.

Image

killmaimburn wrote: so its nice to see the sand bags to have something to work towards.. Did you quickly squidge together a row of 30 and then arrange them then once set paint the wall?, or did your build the bricks\sandbags as you built the wall.. (i might try making a few hem lines on mine..depends on how easy they are to manipulate.

I'll do the sandbag/barricade stuff tomorrow, if you like. :D
killmaimburn wrote:If this is a masked ball, then the other bits of him are off spiking the teachers punch.


DEATH WATCH DEATH RATTLE DEATHS DOOR AINT I DIED ENOUGH BEFORE?
User avatar
ruffian4
4th dan imbecile
Sorceror
 
Posts: 3065
Joined: Sun Dec 09, 2007 12:00 am
Location: Twat hq.

Postby Angelwing » Thu Feb 21, 2008 2:29 pm

Looking sweet. I will be watching for updates!
User avatar
Angelwing
Zoanthrope
Zoanthrope
 
Posts: 2311
Joined: Thu Sep 20, 2007 12:00 am
Location: Bridgwater, Somerset
Medals: 17
Gold (5) Silver (1) Painting Entrant (11)

Postby LordMalekTheRedKnight » Thu Feb 21, 2008 3:16 pm

ruffian4 wrote:Day 2.
Jubilex has gone out, so an update...hang on, no replies? No-one interested? :(

oh no mate, definately interested. :D

(i didnt reply earlier as first it said 'under construction', and ive been busy today: Seth has Docs appt and im at my parents house right now)

i will reply properly later. :)

cheers

~ Tim
8O :D OMG - Im a Dad - of THREE!! :D 8O
:) I am "LMTRK" on The Wizards Community and MTG Salvation
User avatar
LordMalekTheRedKnight
Lord Marmite
Lord General
 
Posts: 4876
Joined: Mon Aug 14, 2006 12:00 am
Location: Stamford, Lincs, UK

holy....

Postby Herne » Thu Feb 21, 2008 3:43 pm

Am loving that church building - looks like a well aged and crumbled ruin. Nice work so far!
My Gallery: http://www.ageofstrife.com/gallery/Herne

Nightbringer wrote:I like Amy Winehouse` music, although she looks like a Whippet in a bin bag.... 8)
User avatar
Herne
Occasional brush wielder
Sorceror
 
Posts: 1429
Joined: Wed Aug 16, 2006 12:00 am
Location: Bromsgrove
Medals: 10
Anvil's Hammer - 1st Place (1) Gold (1) Bronze (2) Painting Entrant (6)

Postby ruffian4 » Fri Feb 22, 2008 12:23 pm

First up some barricades.
Sandbags, lolly sticks and corrugated card.
The bags are from early learning centre air drying clay, just cut into strips, rolled and flattened.
He made the sand bag walls piece by piece “Lego” style. It doesn’t take half as long as you might imagine and allows you to arrange the bags in as organised or chaotic way as you want.

Image

Be careful what sort of base you put them on, as they dry they contract a fair bit and will warp things quite badly.
As he undercoated them, the brush picked up loose bits of sand and deposited it on the bags. This was quite fortunate, as they may have been too smooth to easily dry brush otherwise.

Image

Tank traps are just card lengths with a matchstick glued inside to give a “girder” type appearance.

Image

The barbed wire is filter wire from a car (can’t remember what part), suspended on garden wire uprights.


Image
Last edited by ruffian4 on Fri Feb 22, 2008 12:32 pm, edited 3 times in total.
killmaimburn wrote:If this is a masked ball, then the other bits of him are off spiking the teachers punch.


DEATH WATCH DEATH RATTLE DEATHS DOOR AINT I DIED ENOUGH BEFORE?
User avatar
ruffian4
4th dan imbecile
Sorceror
 
Posts: 3065
Joined: Sun Dec 09, 2007 12:00 am
Location: Twat hq.

Postby killmaimburn » Fri Feb 22, 2008 1:04 pm

Cheers, i might have to have a go at a sand bag wall to start myself off..wooo!
Barely even lurking..
ruffian4 wrote:Handy fellow, this kmb...Like Ahriman delving the paths of the webway ...
World of ME First try at Apoc Batrep WHAT/WHO is AOS?
User avatar
killmaimburn
Now Vanus Clade
 
Posts: 6581
Joined: Fri Sep 21, 2007 12:00 am
Location: Nottingham, mid-land
Blog: View Blog (1)

Postby mattjgilbert » Fri Feb 22, 2008 11:38 pm

The rust effect looks great and the ruin is nice too.

Maybe some snow piles on the sandbags/ across the top of barricades/walls? The looks a little out of place otherwise with snow all around everywhere else...
User avatar
mattjgilbert
BladeDancer
Daemon Prince
 
Posts: 5847
Joined: Wed Sep 19, 2007 12:00 am
Location: Worthing, UK

Postby ruffian4 » Mon Feb 25, 2008 11:02 am

Day 3.
Building buildings.

He wanted to keep most of the landscape bleak and ruinous, so ruins were the way to go.
They were all made with poly ceiling tiles, the ones with the bumpy texture on one side. Though this texture would have been ok, the other side would be flat, so something had to be done.

Image

A mix of 1/3 each of emulsion, pva and builders sand (with the largest stones removed) was applied over all surfaces. This stuff, about the consistency of slightly thin porridge, is quite literally “concrete” like, it dries very tough.
A coat of charcoal grey and light grey dry brush and bob’s your uncle.

Image

We’re on the road to no-where.

To keep in with the bleak abandoned landscape, true roads didn’t seem quite right, so just tank tracks seemed appropriate.

To get this effect, two lines of diy filler was applied in two lines. Depending on the temperature/humidity, these were left for anything from a couple of hours up to about 8, until they were tacky. Left for two long and you can’t make an impression on them. Too little and the filler just gets dragged off the surface.

Image

He made himself a bit of a gadget to make the tracks (more successful than the homemade hot wire cutter, which would have been better of in the hands of a burner boy).
It was a bit of sprue, cut to the width of a russ.
The lid of a milk bottle (with serrated edge) was glued onto each end. This made a “roller” to impress the tracks in the filler.

Most end squarely, but some of the road sections end at 45 degrees. There are also some that turn through 45 degrees.
This makes quite a flexible system, where the tracks don’t look too “square” and can meander about a bit.

Right…hang on, disturbance in the warp.

Image


B****y hell, did you see that? Jubilex is coming back…
Last edited by ruffian4 on Mon Feb 25, 2008 11:15 am, edited 5 times in total.
killmaimburn wrote:If this is a masked ball, then the other bits of him are off spiking the teachers punch.


DEATH WATCH DEATH RATTLE DEATHS DOOR AINT I DIED ENOUGH BEFORE?
User avatar
ruffian4
4th dan imbecile
Sorceror
 
Posts: 3065
Joined: Sun Dec 09, 2007 12:00 am
Location: Twat hq.


Return to Project Logs


 Social Links